使用 Cloudflare worker 以及 Google sheet 自製一個免費的短網址服務
最近租了一個新網域 (josh-hsieh.tw),在設定 Cloudflare 的時候看到 Cloudflare worker 這有趣的東西。其實之前看到的時候就很想試試看,但後來都忘記了XD,想說不妨趁著這次來試試吧!
本來是想做一個 ChatGPT 的 ChatBot 的,但在做的過程中發現 OpenAI 的 API 要錢…!就打了退堂鼓,選擇做了這個小玩具。
環境準備
建立一個有讀取 Google sheet 權限的 API Key
- 到 GCP (Google Cloud Platform) console 新增一個專案,或是使用現有的專案也可以
- 到 GCP APIs Library,啟用 Google Sheet API
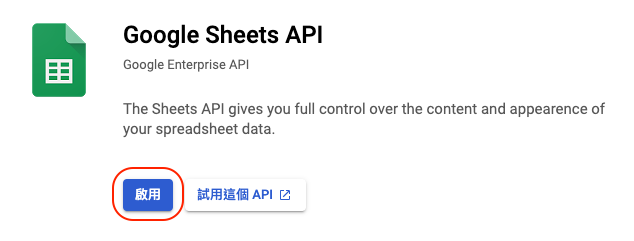
- 接著進入憑證,點擊上方的”建立憑證”,選擇”API 金鑰”,接著就會看見跳出一個寫著 API Key 的小視窗

- (Optional) 限制這個 Key 的權限來增加安全性,例如:只能使用 Google Sheet API 之類的
在 Google Drive 建立一個 Google Sheet
- 進入 Google Drive 後,點選”新增 Google 試算表”
- 接著點進 sheet,看到網址會長這樣:
https://docs.google.com/spreadsheets/d/{GOOGLE_SHEET_ID}/edit#gid=0 - 把 GOOGLE_SHEET_ID 記下來,待會兒會用到
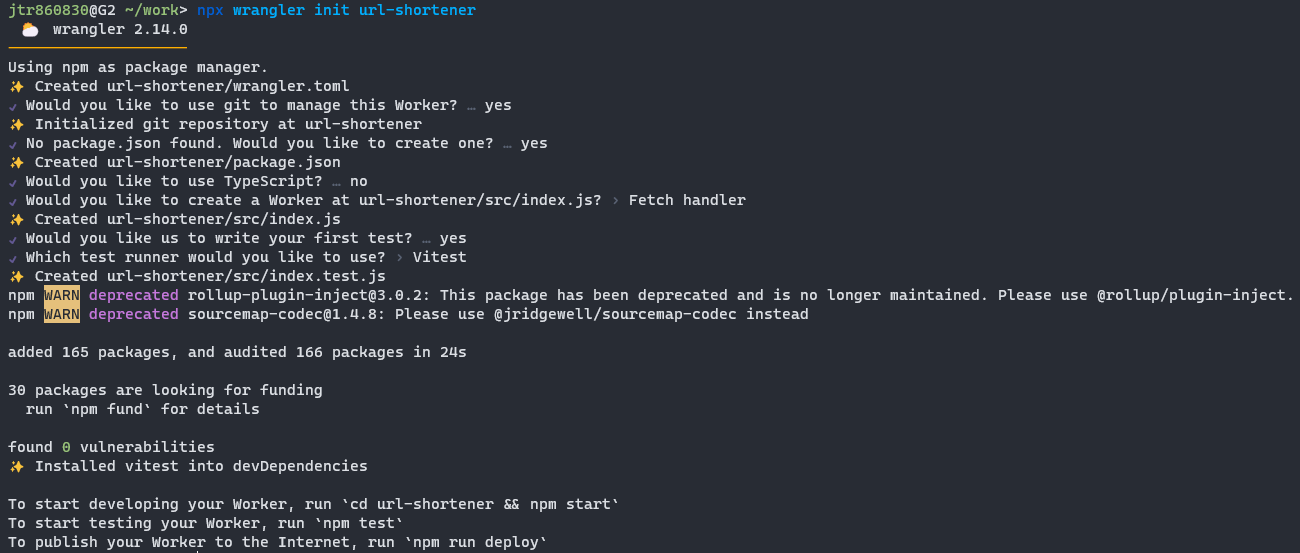
初始化一個 Cloudflare worker 專案
npx wrangler init url-shortener
- 進入專案資料夾,在 wrangler.toml 新增環境變數:
1 | [vars] |
- 修改 src/index.js:
1 | export default { |
- (Optional)
npm run start可以在 http://localhost:8787/ 做個簡單測試
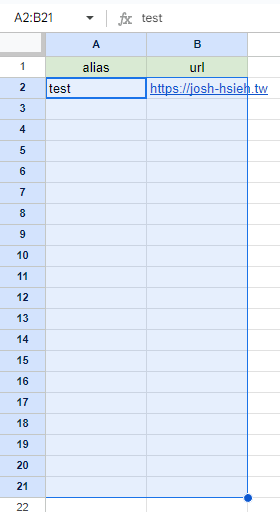
記得要去 Google sheet 當中填入測試資料,不然永遠都會回 404
可以注意到 Google sheet API 的網址當中有一段
A2:B${env["URL_MAX_NUM"] + 1}這是用來標示取得試算表內容的範圍,這個寫法會被 JS template literals 解析為A2:B21,範圍如下圖,可以想像為使用滑鼠選取試算表範圍
npm run deploy- 進入 Cloudflare dashboard 的 workers tab 就能看到 worker 出現了
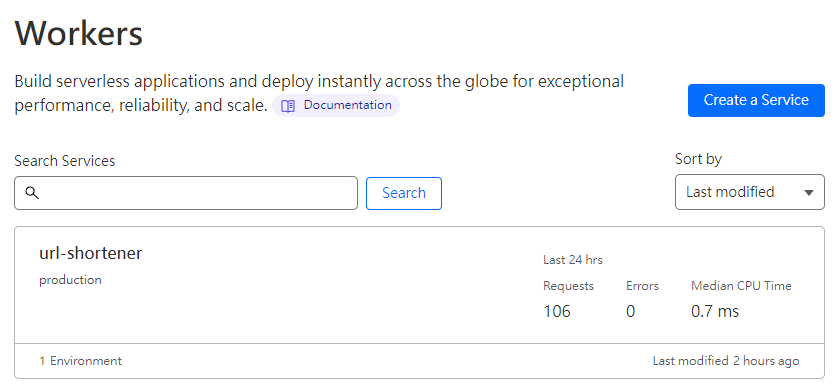
- 接著可以點選 worker 進入 trigger 的 tab,查看自動分配給 worker 的網址,就能透過網址使用短網址服務了

- 也可以設定用 custom domain

本來有想要用 googleapis 這個 Node module,但因為 Cloudflare worker 的 runtime 跟 Node.js 不同所以不能使用,希望未來會越來越兼容
附上完整程式碼: https://github.com/jtr860830/cloudflare-worker-url-shortener